I have asked for this for many years, and we got it in V14!
This is my guide and first reaction.
If you have Admin Assistants or need to do your marketing, you need to use Word or some 3rd party to do what should be a simple effort.
HCL has given us a nice Mail Merge inside the notes client.
It may take some testing for your first one, but hang in there, it is much easier than other methods I have used.
I will elaborate on these topics below:
- Where is the Mail Merge option
- What you need to set up the Mail Merge
- Creating your Mail Merge
- Previewing and Running a Mail Merge
Where is the Mail Merge option?
Naturally, the first place to get information is the HCL Documentation.
https://help.hcltechsw.com/notes/14.0.0/client/mail_create_mailmerge.html
I'd like to say this is well-documented, so someone who is not a developer or in IT can follow along.
But it isn't, which is one of my few issues and why I am writing this blog post.
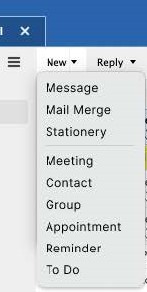
Presuming you updated your Notes client to V14 and updated your mail file template to V14, Mail Merge is a newly added option in your Mail inbox view, when you select .
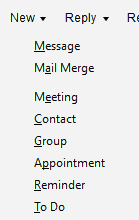
(1st screenshot is from the HCL Docs and presumably a Mac client, the 2nd is from my Windows client, How do I get the Stationery option in Windows?)
What you need to set up the Mail Merge
Like most Mail Merges, you need your data, usually in a spreadsheet. HCL asks for Excel. I did not test any other spreadsheets.
The documentation says, but doesn't show or provide an example:
- Create an Excel spreadsheet.
Each column represents an aspect of the email body that will be personalized; each row should specify every user receiving the email and their personalized information.
- Save the Excel file.
Took me a few tries to figure this out.
Naturally, every row should be a name, easy enough.
What is the column story exactly?
At first, I tried putting in details, but that didn't work right.
You need to provide a Title to each column.
I thought I needed the Notes designer name for each field, which would be crazy for an end user, but I was wrong.
The title can be anything you want; this is cool because oftentimes, you get hard requirements for naming.
But make it easy to follow, as you will see in the next steps.
Here is an example of my simple test Excel file, without the attachment column.
Creating your Mail Merge
This is what you came here for, and it is set up like a Wizard to help you.
After selecting New>Mail Merge and you select the Excel file you created, you will see this dialog box:
(1st screenshot is the documentation and a mac client, 2nd is my windows client. Note the differences, Stationery, and Attachments are not consistent)
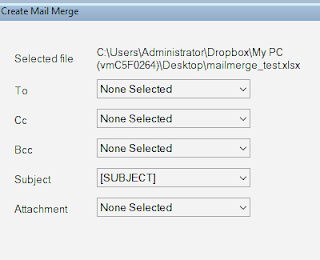

If you click on the drop-downs you can see all the column titles you created and in my screenshot below, it recognizes some names directly.Attachments in Excel are messy, but I tested using a local file link.
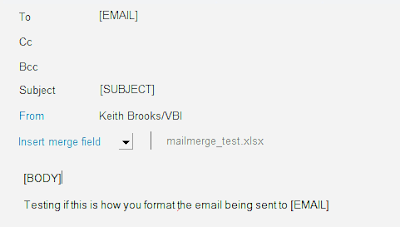
Once your basic fields are defined, you move to the memo form. NOTE: The attachment(s) do not appear anywhere in this form! But they are there, as we will see shortly.
I did not know what to expect, so I created a "Body" column with the text I wanted. Normally, this is where you would paste your Word document or email template, so the body field I created is not needed, but I added the field there to show an example of fields and text.
People who are used to creating a Mail Merge will understand that you format the mail/body text like usual and you can include graphics and other changes to fonts, etc..
NOTE: In my testing graphics that appeared in the preview did not come through to the recipient.
Usage cases for this include bulk email senders, bill notifications, or other similar types of standardized messages, but if you don't need heavy, intensive graphics, this will do quite well for your marketing team, too. YMMV.
When you need your fields from the Excel file, click on the Insert merge field, and it will add the block. You can then move it or work around it, as i did with BODY below.
Once your mail is ready, click the Preview and Send button.
Previewing and Running a Mail Merge
I grabbed a side-by-side screenshot to show you how the form looked compared to the preview.
You can see the attachment is now shown and takes up the top part of the mail, I would prefer it be on the bottom, and this causes a different issue when NOT including attachments, as we will see below.
There is a little arrow and number for you to check your previews, and if you need to edit it, select the Continue Editing button, or if it is ok to send, click on the Send Mail Merge button.
The screenshot below is how the email looks in my Verse client, and Gmail, when I receive it.
NOTE: I need to verify what went on, but the Mail merge seems to include an auto bcc to the sender. Be nice if this was documented or stopped, because why would I want 100s of emails flooding my inbox?
Note the long line across and how the message doesn't start on top but only under that long line? That area is the attachment area.
My hope is HCL fixes this in the future because it looks like the mail got cut off or is missing something.
For a fresh Out of The Box benefit for people, I like it and hope to use it in my marketing efforts.
Hope this helps you and your team that needs mail merge and thank an HCL person for listening to the customer voice.


Nice find, I didn't know of this feature :-)
ReplyDeleteThis and more in the what's new document for Notes and Domino
DeleteTo understand how this is implemented and where it originated, just take a look at the mail template. The code is open, so you can also change the appearance and functionality.
ReplyDeleteI am not so sure I want to change it without understanding why it was set up like it is. Mail template positioning/sizing is not simple
Delete