Tuesday, December 19, 2023

SSL Cert Renewed in Certmgr but no one could see it

Certmgr is the greatest thing in Domino these days if you are an admin.

Autorenewing SSL saves so many problems, delays, and potential loss of revenue for customers that it is, in my opinion, one of the best things HCL has added to Domino.

Much of the credit for it goes to HCL Lifetime Ambassador Daniel Nashed. 

When you see him at Engage or DNUG, buy him a beer.

Daniel was on hand to help me with my problem tonight, and he was correct with his original assessment, Certmgr should just work. 

I agreed, and it was working, or so it showed in the view when verifying it using "tell certmgr show certs" at the server console, but we could not see the validated certificates for 2 domains.

Since I had manually renewed them today, we should have seen a date of expiration for March 18. Instead, we saw December 17th for the one that expired yesterday, and the other showed January 21.

The TLS cache should be auto-refreshing when it gets the new certificates, but appeared to not be doing the task.

We reviewed the basic configuration and tried some test requests, which should have triggered a cache refresh and resolved the issue. But that didn't help us see the correct certificates in our browsers.

While Daniel asked me about different parameters, I learned something about the updated certmgr, we don't need to put the .kyr name in the Security tab, TLS options field. 

Instead, we should be using the DNS name. I totally missed this. The .kyr name in the field is there for the legacy people who have yet to move to V12 or V14. See page 36 of the slide deck mentioned below.

You can read Daniel's slides from his OpenNTF session, which is full of deep technical information. https://blog.nashcom.de/presentations/openntf2021_domino_certmgr.pdf

The other part, which I did know, but had yet to remove from the customer server is the Internet Sites Basics tab, DSAPI Filters field no longer requires ncertmgrdsapi.


After doing these bits of cleanup, and restarting HTTP a few times, we were still left with the issue of incorrectly reported SSL certificate dates.

We turned on debugging for the cache using set config CERTSTORE_CACHELOG=1. 
Page 47 in the above slide deck.

And we got nothing.

Which surprised both of us.

And then we went to look at the notes.ini to see if anything was pointing to the wrong place.

And this is where we found the problem.

Now, there is a parameter that should not have been there at all, and there was only one Google reference for it that we found. Evidently, that reference should not have been public, but it was, and someone at the customer site had added it sometime in the last 60 days or so because Certmgr had been running fine for over a year already.

For the sake of some poor admin out there troubleshooting this, I will say that if you experience the same problem as I did, look in your Domino notes.ini for a line that starts with "SSL_DISABLE_TLS".

I will not put the rest of the command here because, as Daniel said, no one should be using it.

If you find something like this, just remove the line outright from your notes.ini.
You can use "set config ssl_disable_tls(rest of the name)=" to remove it from your active server.
There is no 0 or 1 to put to remove it.

Then, at your server console, type "restart task HTTP," which is the better way to restart HTTP.

And poof, like magic, it all worked again.

That command blocks the newer TLS Cache refresh implementation from running. Thus even though Certmgr could get the updated certificates, it could not run the refresh because this line was telling it not to run.

Customers are so cute when they tell you they didn't change anything.


Wednesday, December 13, 2023

Domino V14 - A New User Capability - Mail Merge

I have asked for this for many years, and we got it in V14! 

This is my guide and first reaction.

If you have Admin Assistants or need to do your marketing, you need to use Word or some 3rd party to do what should be a simple effort.

HCL has given us a nice Mail Merge inside the notes client.

It may take some testing for your first one, but hang in there, it is much easier than other methods I have used.

I will elaborate on these topics below:

  • Where is the Mail Merge option
  • What you need to set up the Mail Merge 
  • Creating your Mail Merge
  • Previewing and Running a Mail Merge

Where is the Mail Merge option?

Naturally, the first place to get information is the HCL Documentation.

https://help.hcltechsw.com/notes/14.0.0/client/mail_create_mailmerge.html

I'd like to say this is well-documented, so someone who is not a developer or in IT can follow along.

But it isn't, which is one of my few issues and why I am writing this blog post.

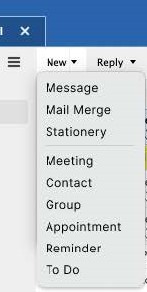
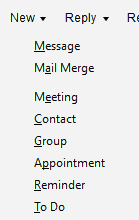
Presuming you updated your Notes client to V14 and updated your mail file template to V14, Mail Merge is a newly added option in your Mail inbox view, when you select New > Mail Merge.

(1st screenshot is from the HCL Docs and presumably a Mac client, the 2nd is from my Windows client, How do I get the Stationery option in Windows?)
mail merge on dropdown menu in Notes UI   

What you need to set up the Mail Merge 

Like most Mail Merges, you need your data, usually in a spreadsheet. HCL asks for Excel. I did not test any other spreadsheets.

The documentation says, but doesn't show or provide an example:
  1. Create an Excel spreadsheet.

    Each column represents an aspect of the email body that will be personalized; each row should specify every user receiving the email and their personalized information.

  2. Save the Excel file.
Took me a few tries to figure this out.

Naturally, every row should be a name, easy enough.

What is the column story exactly?

At first, I tried putting in details, but that didn't work right.

You need to provide a Title to each column.

I thought I needed the Notes designer name for each field, which would be crazy for an end user, but I was wrong. 

The title can be anything you want; this is cool because oftentimes, you get hard requirements for naming.

But make it easy to follow, as you will see in the next steps.

Here is an example of my simple test Excel file, without the attachment column.

Then save your file.

Creating your Mail Merge

This is what you came here for, and it is set up like a Wizard to help you.

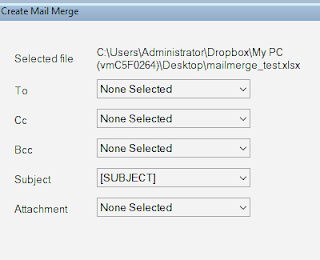
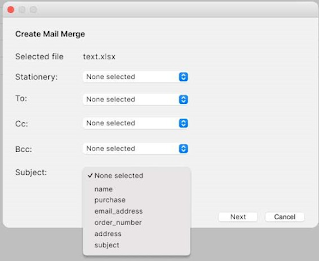
After selecting New>Mail Merge and you select the Excel file you created, you will see this dialog box:
(1st screenshot is the documentation and a mac client, 2nd is my windows client. Note the differences, Stationery, and Attachments are not consistent)


If you click on the drop-downs you can see all the column titles you created and in my screenshot below, it recognizes some names directly.
Attachments in Excel are messy, but I tested using a local file link.

Once your basic fields are defined, you move to the memo form.
NOTE: The attachment(s) do not appear anywhere in this form! But they are there, as we will see shortly.

I did not know what to expect, so I created a "Body" column with the text I wanted. Normally, this is where you would paste your Word document or email template, so the body field I created is not needed, but I added the field there to show an example of fields and text.

People who are used to creating a Mail Merge will understand that you format the mail/body text like usual and you can include graphics and other changes to fonts, etc..

NOTE: In my testing graphics that appeared in the preview did not come through to the recipient.

Usage cases for this include bulk email senders, bill notifications, or other similar types of standardized messages, but if you don't need heavy, intensive graphics, this will do quite well for your marketing team, too. YMMV.

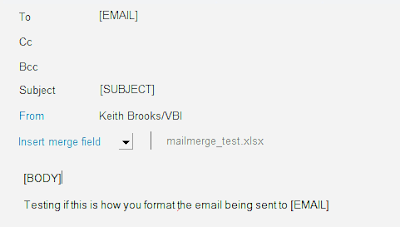
When you need your fields from the Excel file, click on the Insert merge field, and it will add the block. You can then move it or work around it, as i did with BODY below.


Once your mail is ready, click the Preview and Send button.

Previewing and Running a Mail Merge

I grabbed a side-by-side screenshot to show you how the form looked compared to the preview.

You can see the attachment is now shown and takes up the top part of the mail, I would prefer it be on the bottom, and this causes a different issue when NOT including attachments, as we will see below.


There is a little arrow and number for you to check your previews, and if you need to edit it, select the Continue Editing button, or if it is ok to send, click on the Send Mail Merge button.

The screenshot below is how the email looks in my Verse client, and Gmail, when I receive it.

NOTE: I need to verify what went on, but the Mail merge seems to include an auto bcc to the sender. Be nice if this was documented or stopped, because why would I want 100s of emails flooding my inbox?

Note the long line across and how the message doesn't start on top but only under that long line? That area is the attachment area.

My hope is HCL fixes this in the future because it looks like the mail got cut off or is missing something.


For a fresh Out of The Box benefit for people, I like it and hope to use it in my marketing efforts.

Hope this helps you and your team that needs mail merge and thank an HCL person for listening to the customer voice.


Thursday, December 7, 2023

V14 Notes, Domino, Traveler are out Now

But your Notes install may have an issue.

NOTE: This post will be updated/edited as I figure out more of what is going on. Domino install-info after the Notes client info below.

I tried installing HCL notes, only comes in 64-bit now, on 2 different machines.

The installation was on top of the existing ones.

You may want to use the NICE tool to clean up the prior install first, might save you some headache.

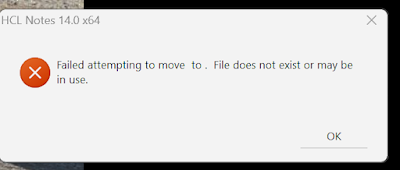
1st is my usual laptop, 6 months old, Windows 11 Pro which already had 1202fp2(64-bit), and while it looked ok after about 20 minutes of waiting to finish, it gave me this, with no more details. It possibly happened while uninstalling or disabling something.


And then backed out the installation.

Subsequently, what I did was extracted the installer to a new location.
Then ran the setup, RunAs admin.
And this time it worked. Thank you Marc Thomas for the hint that there may be some extraction issue and to try it this way.
So, 2 clients installed, a server with traveler installed and it took about an hour and a half including troubleshooting/retries.


The 2nd installation on my Windows Server 2019 which is a hosted VM gave me this message:

And after trying again to click ok said this:


Never had something like this happen before during an install. 

I extracted the 1202 notes client as requested to get the MSI file and then the installation continued on its way. Also takes about 20 minutes.

So the Server install completed, even after asking for the 1202 code.

Now to figure out what is wrong with my Windows 11 install.

Domino Install

If you do a custom install, like I do, you will see the options to install Nomad and Ontime and I think Verse, my screen capture did not capture, sorry.

You will also see something my beta code did not do which is confirm the Domino login name for the startup services.

You may want to be careful with that if you don't know how you are logging in because your server may not start afterward.

Time to update was between 5-10 minutes including restarting the server and updating the Directory.

Traveler is also available and installs like usual in a few minutes.

Nomad works just like it did before, so the update did not change that, but it would be nice if it told us which version it was, instead of developer code which is 1.0.9.5525-3341. How do I know if mine was even updated? Maybe 1.0.9 was what was installed, but i already was at that level.

Verse works as well. 3.2, which I had installed, need to look up what version is installed as V14.

Ontime kept my configuration, and the booking settings still work as well.

Pretty cool when you think about all the stuff HC has to verify on the Domino side given these things are now included in the installation.